


Installation du combiné numérique VW Touareg 7L 2003–2010 : 37 étapes en photos réelles
Installation du combiné numérique VW Touareg 7L 2003–2010 : 37 étapes en photos réelles
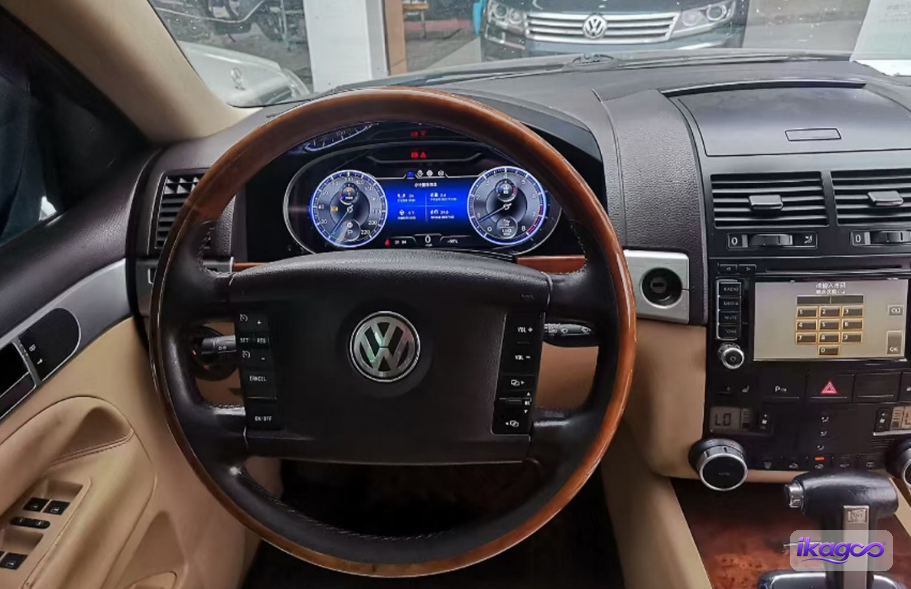
Installation du combiné numérique VW Touareg 7L pour modèles 2003–2010 est documentée ici à partir de la séquence photo d'installation réelle de iKAGOO. Le guide suit l'ordre photographié, du retrait de la garniture du tableau de bord et du montage du combiné jusqu'à la conservation de la carte mère d'origine, le passage dans la boîte à gants côté passager et les vérifications finales.
Le point technique le plus important de ce parcours est visible sur les photos elles-mêmes : la carte mère d'instruments d'origine est conservée, montée sur un support et rebranchée dans la zone de la boîte à gants côté passager.
Vous retirez l'encadrement et les supports du combiné d'origine, connectez et montez le nouveau combiné LCD, acheminez le câble de rallonge côté passager, conservez la carte mère d'instruments d'origine, rebranchez cette carte dans la zone de la boîte à gants, puis testez les données du véhicule prises en charge et les fonctions d'avertissement avant de refermer le tableau de bord.
Sur quelles preuves ce guide d'installation du combiné numérique VW Touareg 7L est-il basé ?
Réponse directe : ce guide est basé sur la séquence d'installation réelle du Touareg iKAGOO : un cache plus 36 photos des étapes, avec l'ordre d'origine de 37 étapes préservé. Les images documentent directement le retrait des garnitures et des supports, le montage du nouveau combiné, le cheminement du câble de prolongation, la conservation de la carte mère d'origine et le placement de la boîte à gants.
Les mêmes preuves définissent également les limites de l'article. La portée des produits pris en charge couvre le VW Touareg 7L 2003–2010, mais les photos ne prouvent pas que chaque véhicule de cette tranche d'années présente une configuration interne identique, et elles ne montrent pas de procédure de codage ; aucun de ces points n'est donc présenté comme un fait universel.
VW \/ Volkswagen Touareg 7L, années modèles 2003–2010. Pour un ajustement exact, la configuration du combiné et du tableau de bord d'origine doit encore correspondre au chemin fourni.
Séquence source en 37 étapes issue du matériel d'installation réel iKAGOO, chaque photo de marque téléchargée étant conservée en regard de son étape d'origine.
L'article explique comment le travail sur le combiné côté conducteur se connecte au déplacement ultérieur de la carte d'origine, au lieu de traiter chaque photo comme une légende isolée.
L'ajustement est confirmé à partir du combiné d'origine, de l'ouverture du tableau de bord, de la plateforme/configuration et des détails LHD/RHD — et non à partir de la seule année.
Comment retirer l'habillage du combiné sur un VW Touareg 7L 2003–2010 ?
Réponse directe : Retirez d'abord la garniture de la zone du volant, puis les garnitures latérales et supérieures, suivies des vis exposées et des deux supports de montage des instruments. L'étape 13 est le moment de comparer l'ouverture exposée du tableau de bord avec la séquence photo iKAGOO avant de connecter le nouveau combiné.
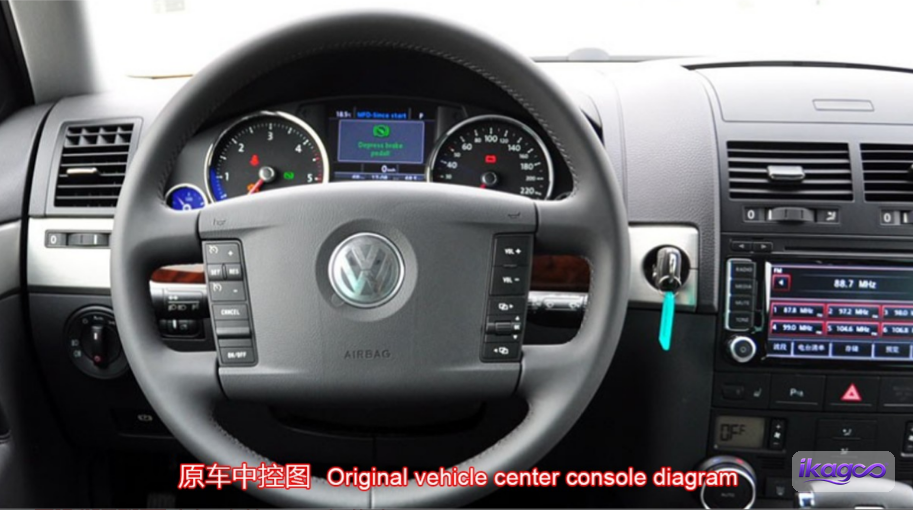
Enregistrez le tableau de bord d'origine avant le démontage.
Commencez avec la voiture exactement telle qu'elle est arrivée. La première photo sert de référence pour la position du combiné d'origine, la garniture environnante et l'ajustement général du tableau de bord. Prenez également votre propre photo à ce stade ; cela vous donne un élément concret de comparaison lorsque le nouveau combiné et la garniture sont remis en place.
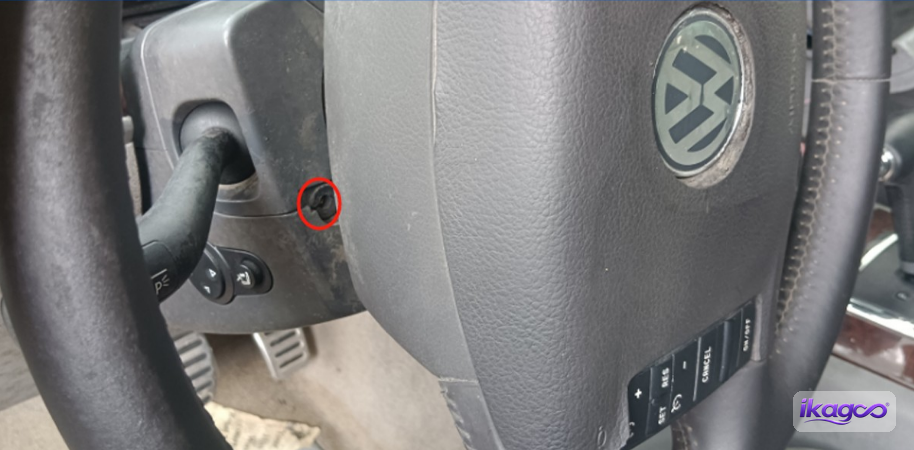
Retirez la vis située au niveau du volant
Retirez la vis indiquée autour de la zone du volant. C'est le premier point de fixation dans la séquence photographiée et il ouvre la voie à la garniture qui se retire ensuite.
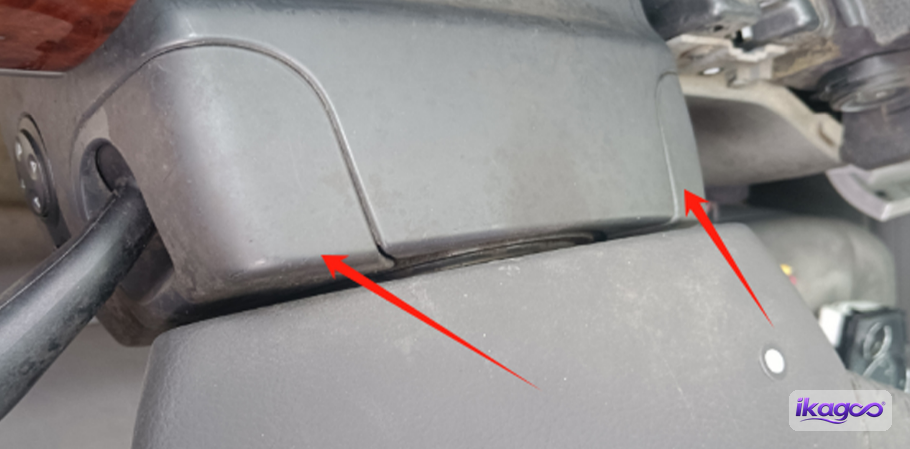
Détachez la pièce de garniture du volant
Une fois la vis retirée, détachez délicatement la pièce de garniture indiquée autour de la zone du volant. Travaillez à partir du joint visible et libérez la pièce progressivement plutôt que d'essayer de retirer toute la section d'un seul mouvement.
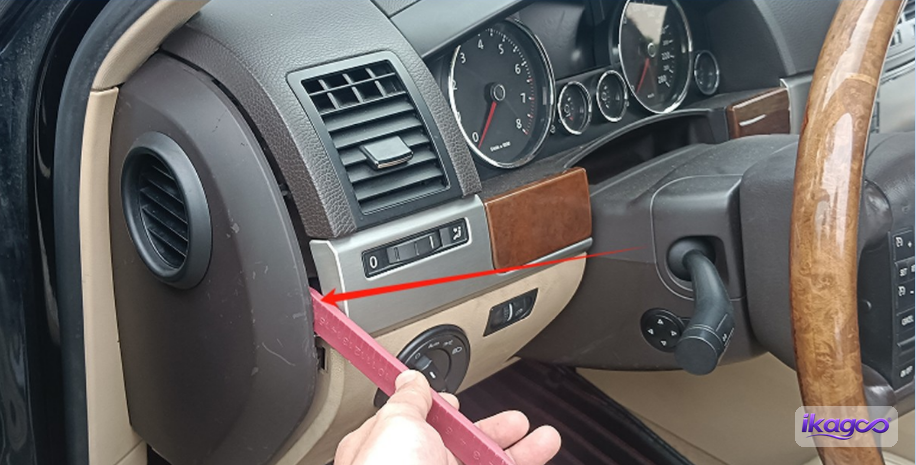
Ouvrez la garniture latérale à côté du combiné d'instruments.
Déplacez-vous sur le côté de la zone d'instruments et déclipsez la garniture latérale montrée sur la photo. Cela commence à séparer les pièces de garniture qui verrouillent le cadre du combiné dans le tableau de bord.
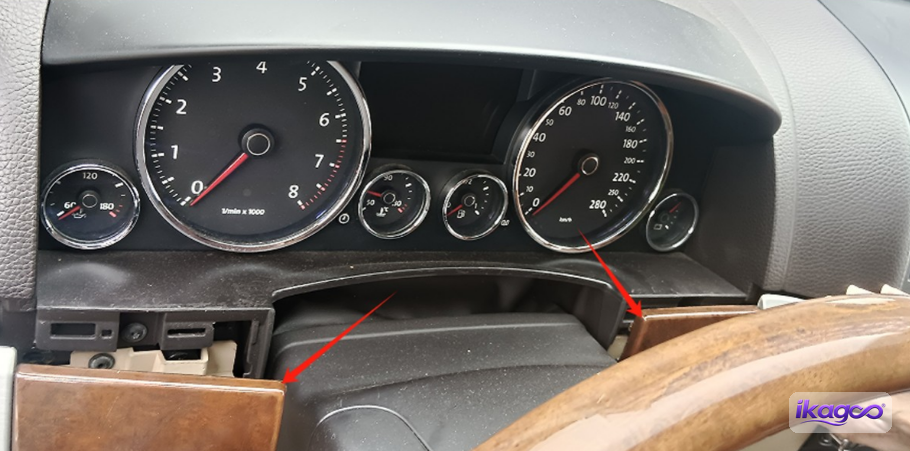
Déclipsez la garniture des deux côtés.
Continuez des deux côtés du cadre du combiné. Une fois les pièces latérales détachées, la garniture supérieure peut être retirée sans forcer contre des panneaux encore clipsés.
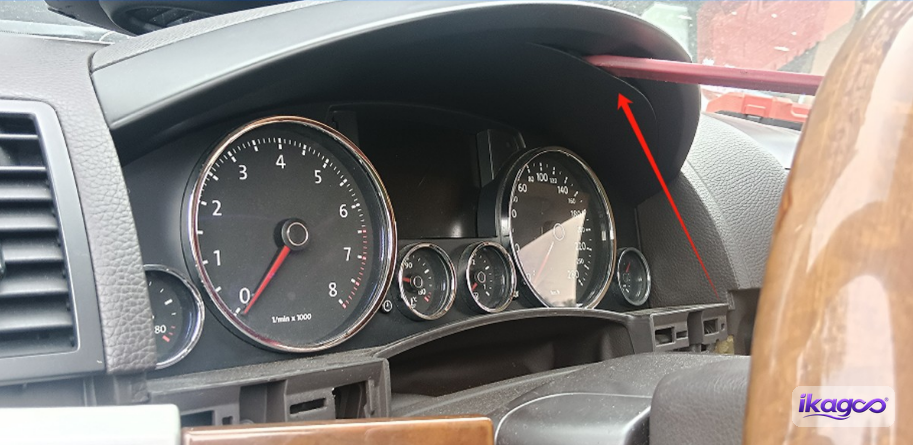
Soulevez la garniture décorative supérieure.
Déclipsez la pièce décorative supérieure au-dessus du combiné. Le retrait de ce panneau expose les prochains points de fixation dans la séquence d'installation.
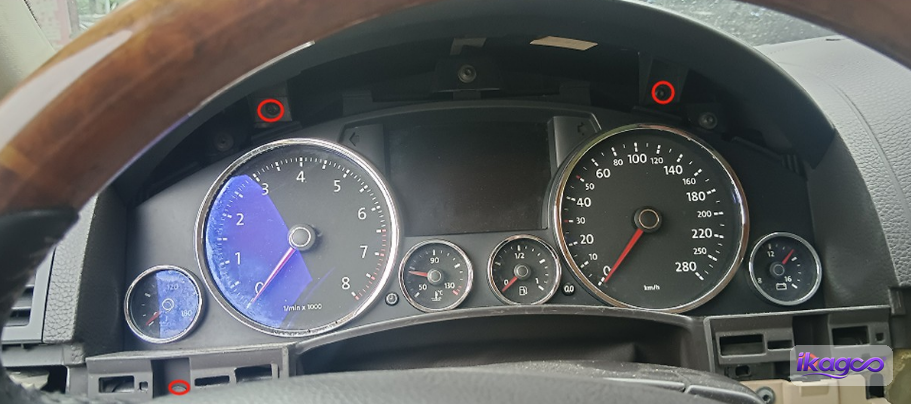
Retirez les vis exposées
Une fois la garniture supérieure retirée, retirez les vis désormais visibles. Ces fixations maintiennent la structure environnante qui doit être retirée avant de pouvoir atteindre les supports de montage du combiné.
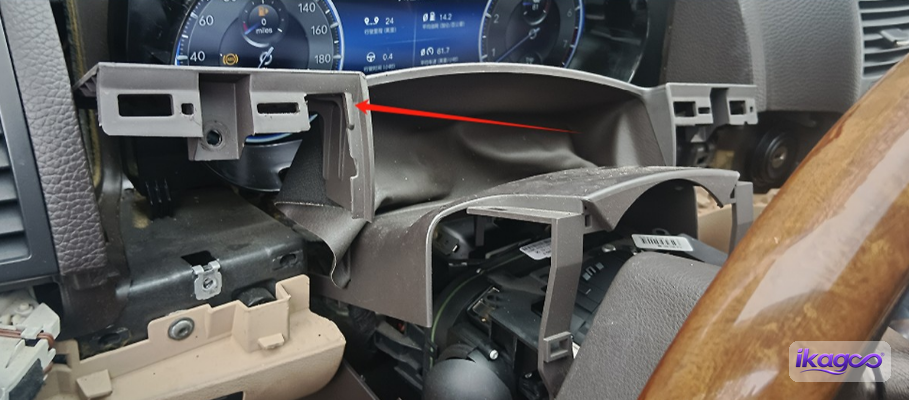
Détachez la garniture latérale restante
La photo suivante revient à la garniture latérale. Détachez les pièces restantes des deux côtés et maintenez la garniture pendant qu'elle se sépare du tableau de bord.
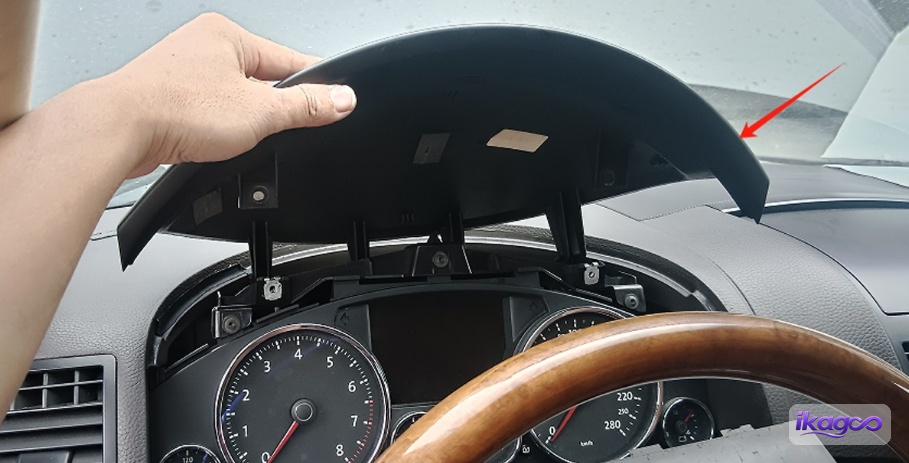
Retirez la section de garniture supérieure autour de la zone des instruments.
Maintenant, retirez la section de garniture supérieure restante montrée sur la photo. À ce stade, la structure de montage du combiné commence à devenir entièrement visible.
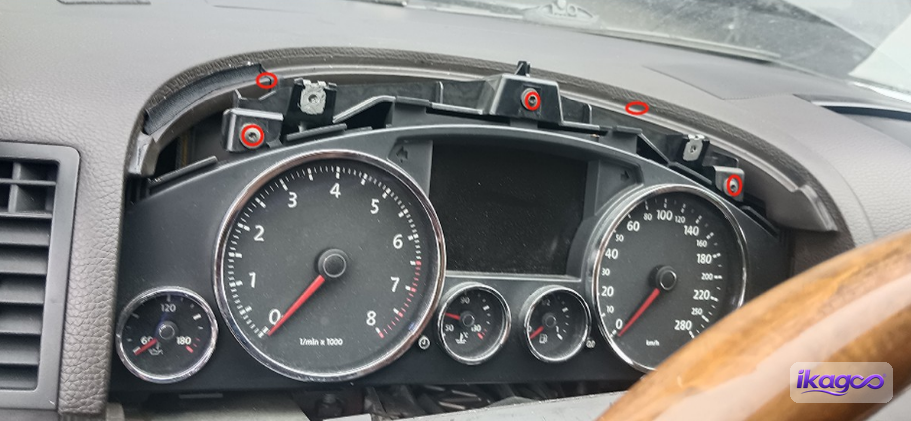
Retirez les vis du support de montage du combiné
Retirez les vis qui maintiennent le support de montage du combiné. C'est à ce stade que le travail passe du retrait de la garniture décorative au retrait de la structure qui positionne physiquement le combiné.
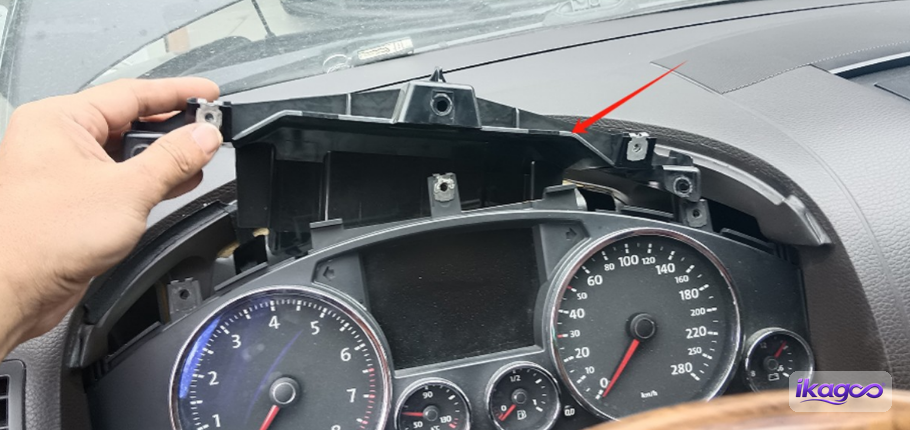
Soulevez le premier support de montage
Une fois ses vis retirées, sortez le premier support montré dans la séquence. Conservez-le avec ses fixations car il fait partie de la référence de montage d'origine.
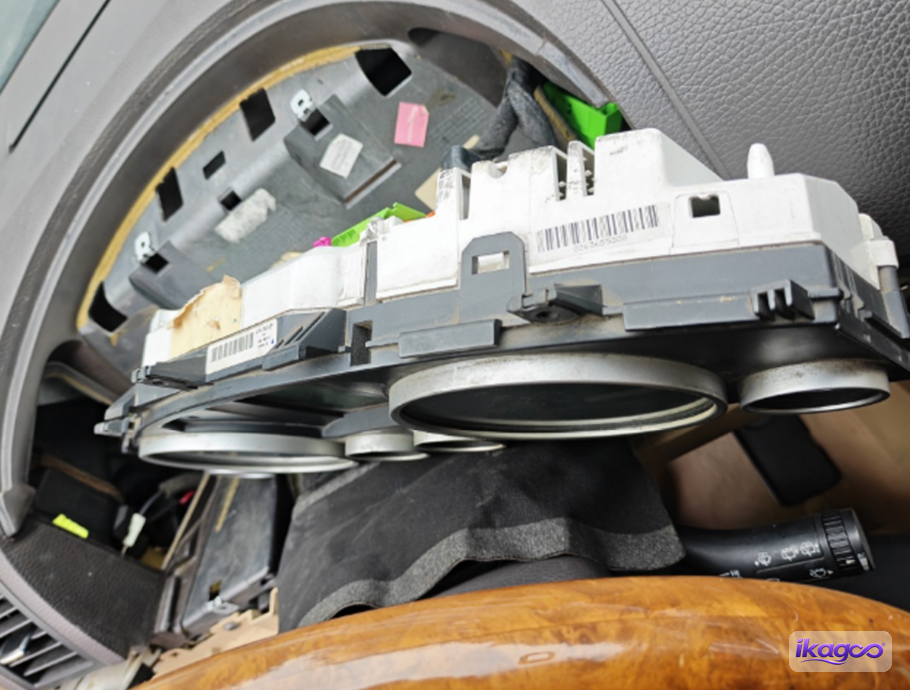
Retirez le deuxième support
Retirez le deuxième support dans la même zone. Une fois les deux pièces du support retirées, l'ouverture du tableau de bord est suffisamment dégagée pour être comparée au nouveau tracé du combiné.
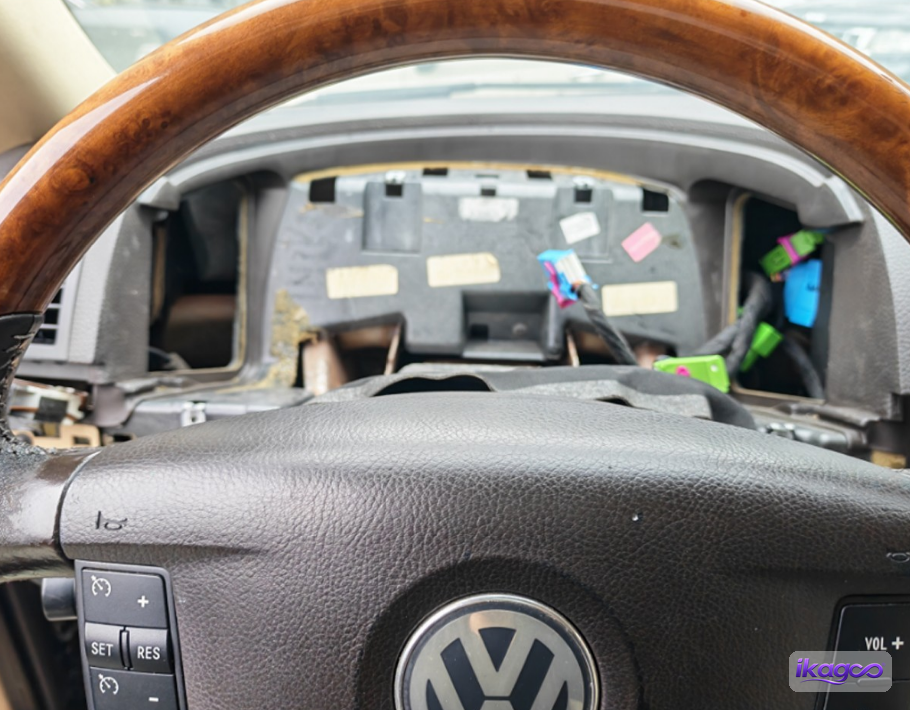
Comparez l'ouverture exposée avant de connecter le nouveau combiné
Faites une pause ici et comparez l'ouverture de votre tableau de bord avec la photo. C'est le moment le plus utile pour détecter une inadéquation d'ajustement avant qu'un nouveau matériel ne soit connecté ou mis en place.
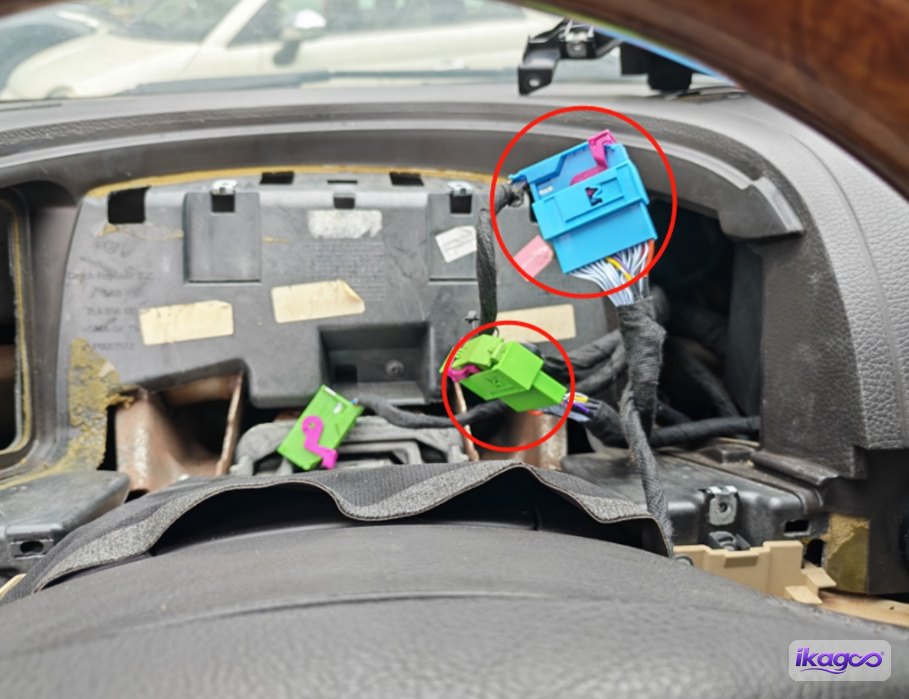
Comment le combiné numérique iKAGOO est-il connecté dans un VW Touareg 7L 2003–2010?
Réponse directe : Branchez la fiche d'alimentation principale et la fiche fine du combiné, alignez les deux pieds de fixation inférieurs avec les goujons d'origine, placez le combiné dans l'ouverture, acheminez le câble de prolongation vers la boîte à gants, puis fixez le combiné et remontez la garniture. La correspondance des connecteurs et le cheminement des câbles doivent être vérifiés avant que l'unité ne soit recouverte.
Connectez le câble d'alimentation principal
Connectez le câble d'alimentation principal au nouveau combiné LCD comme illustré. Le connecteur doit correspondre à la prise fournie et s'insérer dans l'orientation prévue.
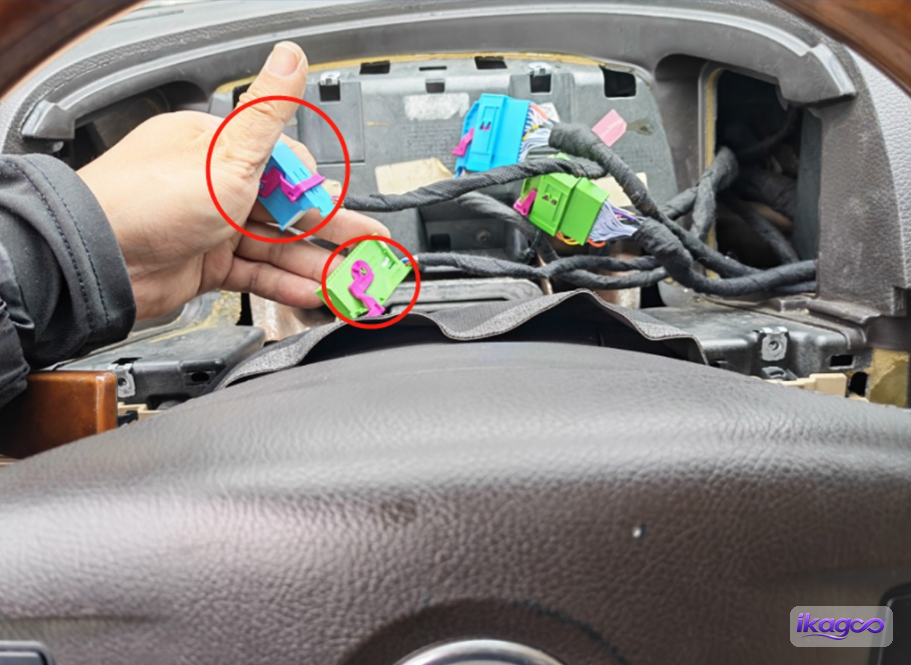
Connectez la fiche fine au combiné LCD
Insérez la fiche à fil fin montrée sur la photo dans la prise correspondante du combiné LCD. Assurez-vous qu'elle est bien enfoncée avant de déplacer le combiné vers l'ouverture du tableau de bord.
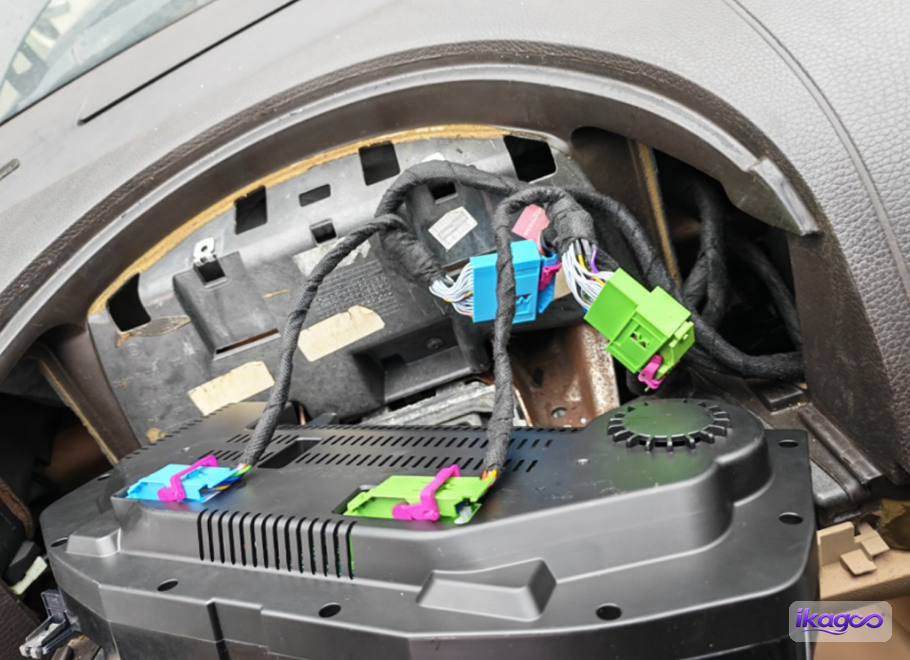
Vérifiez les deux connexions du combiné avant le montage
Avant que l'écran ne soit installé dans le tableau de bord, examinez les connexions terminées montrées sur la photo. C'est la dernière occasion facile de corriger une fiche mal enfoncée avant que l'arrière du combiné devienne difficile à voir.
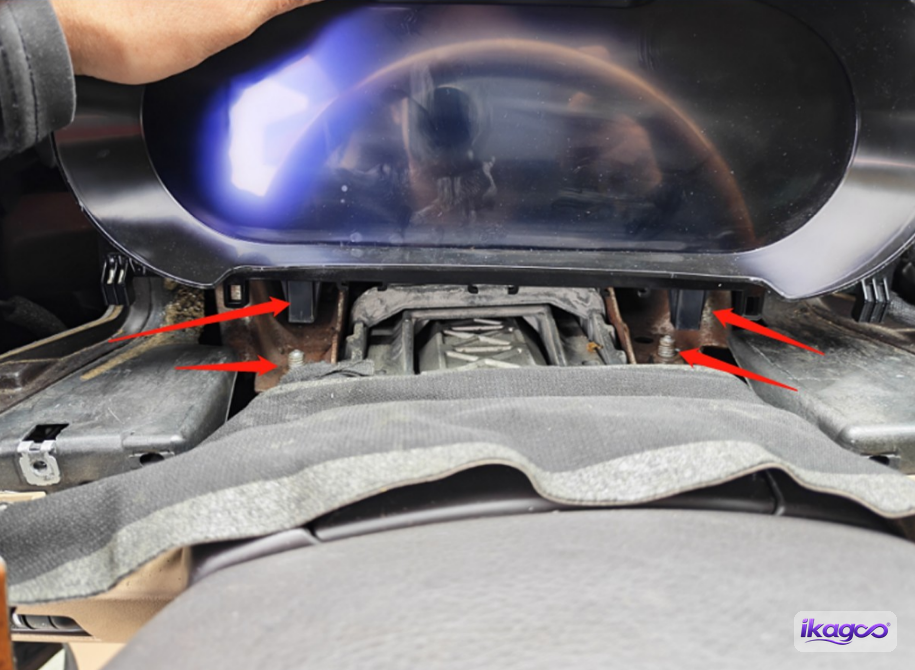
Alignez les deux pieds inférieurs avec les supports de vis d'origine
Alignez les deux pieds de montage inférieurs du nouveau combiné LCD avec les supports de vis d'origine montrés sur la photo. Les deux côtés doivent rejoindre les points de montage d'usine avant de serrer toute vis.
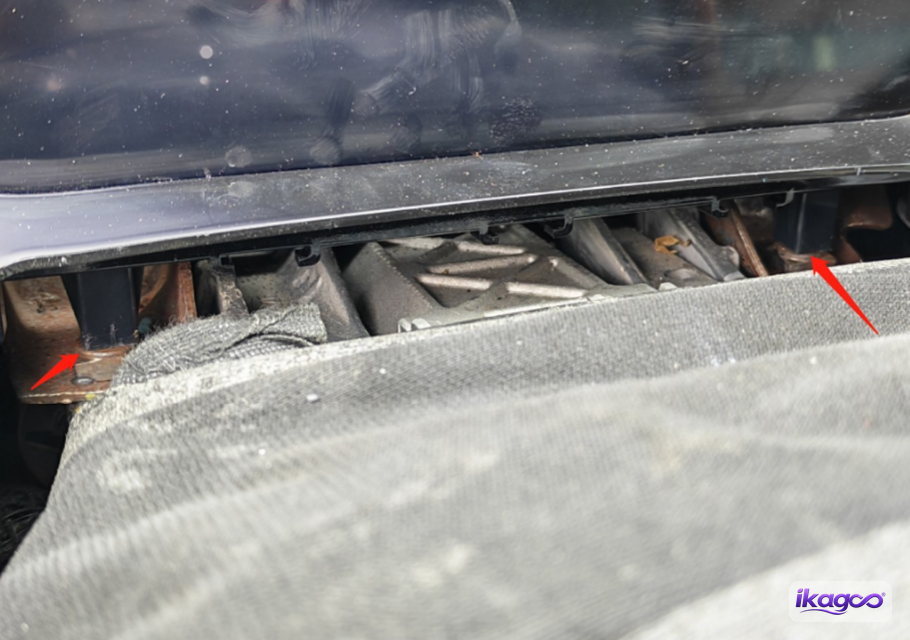
Confirmez que le combiné est assis d'équerre.
Maintenez le combiné dans sa position alignée et vérifiez l'espace autour du boîtier. L'unité doit reposer naturellement dans l'ouverture plutôt que d'être contrainte par les vis.
Placez le combiné LCD en position.
Déplacez le combiné dans sa position finale sur le tableau de bord. Gardez le câblage à l'arrière de l'unité libre pendant que le boîtier se déplace vers l'intérieur, afin que l'ajustement à l'avant ne se fasse pas au prix d'un câble coincé derrière.
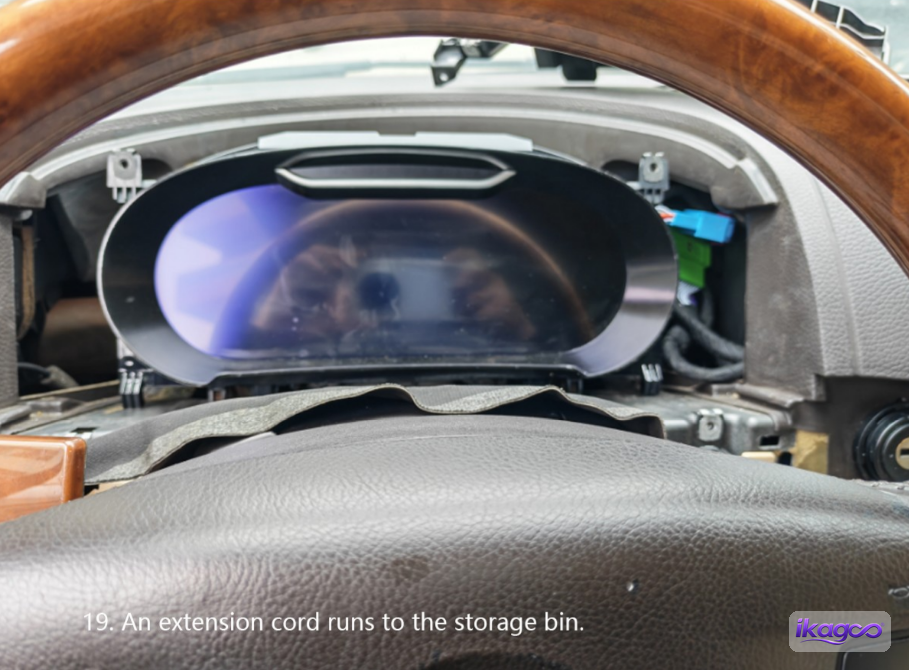
Acheminez le câble de rallonge vers la boîte à gants du passager.
La séquence source introduit à présent le câble de rallonge qui va de la zone du combiné vers la boîte à gants côté passager. Acheminez-le le long du chemin documenté et laissez suffisamment de longueur pour la carte mère d'origine conservée qui sera connectée plus tard.
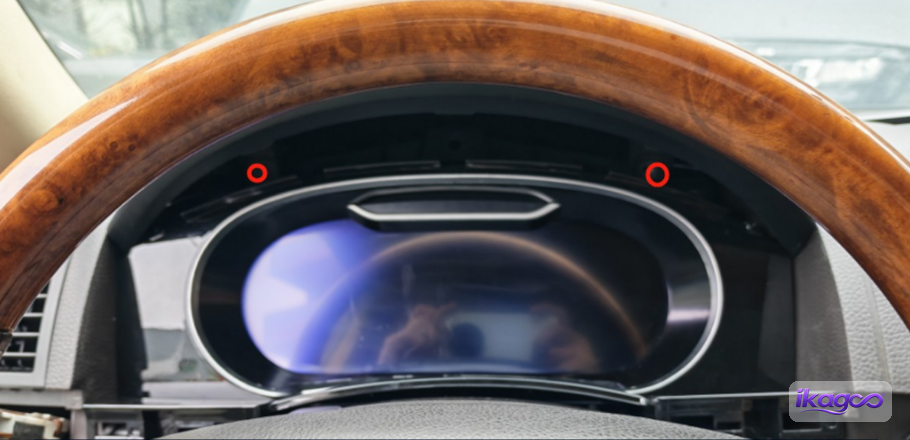
Fixez le nouveau combiné
Une fois le combiné aligné et le câble de rallonge dégagé, installez les vis de fixation. Serrez l'unité dans la position où elle se trouve déjà correctement plutôt que d'utiliser les vis pour forcer l'alignement du boîtier.
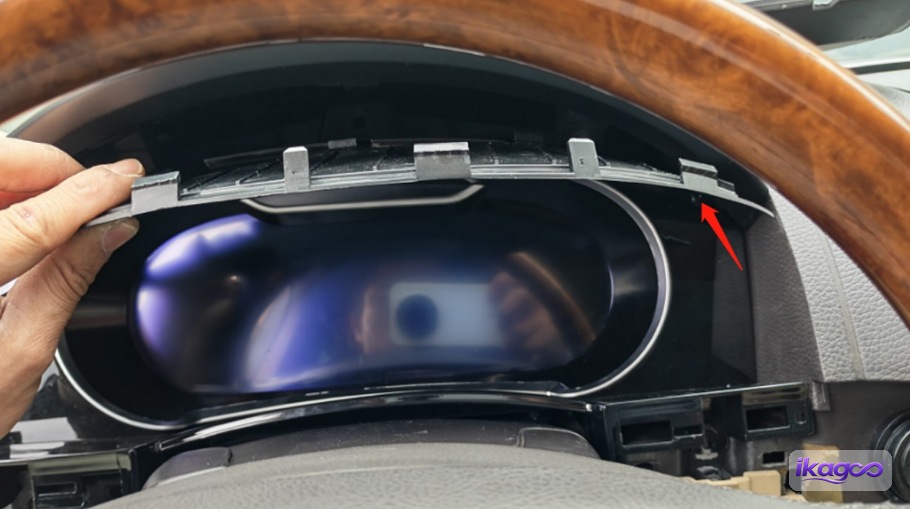
Installez la garniture du combiné LCD
Clipsez la nouvelle garniture du combiné en place autour de l'écran. Faites le tour du bord et vérifiez que la garniture affleure uniformément l'ouverture du tableau de bord.
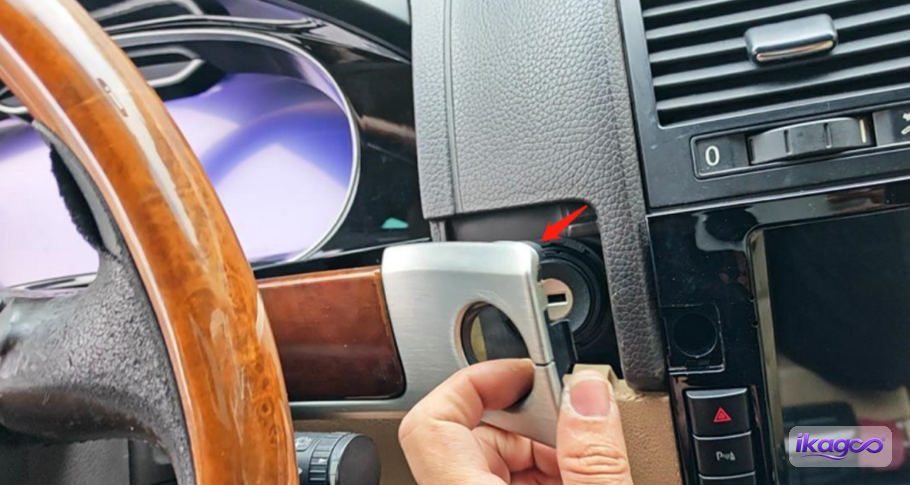
Remontez la garniture latérale d'origine
Replacez les pièces de garniture d'origine des deux côtés du combiné. C'est le premier contrôle visuel que le nouvel assemblage est bien positionné là où le tableau de bord d'origine l'attend.
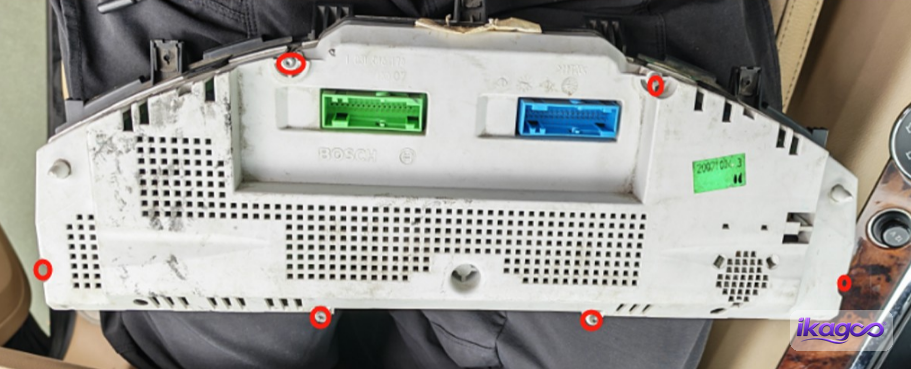
Pourquoi le rétrofit du combiné numérique VW Touareg 7L 2003–2010 conserve-t-il la carte mère d'origine ?
Réponse directe : Cette méthode iKAGOO documentée conserve la carte mère d'instruments Touareg d'origine au lieu de jeter l'électronique complète du combiné d'usine. Les photos sources montrent le combiné d'origine ouvert, la carte retirée puis fixée sur un support métallique fourni.
Retirez la vis du combiné d'instruments d'origine
Le travail passe maintenant au combiné d'instruments d'origine lui-même. Retirez la vis indiquée sur la photo afin que le boîtier d'origine puisse être ouvert. À partir de ce moment, le combiné d'origine est démonté car une partie de son électronique restera dans le véhicule.
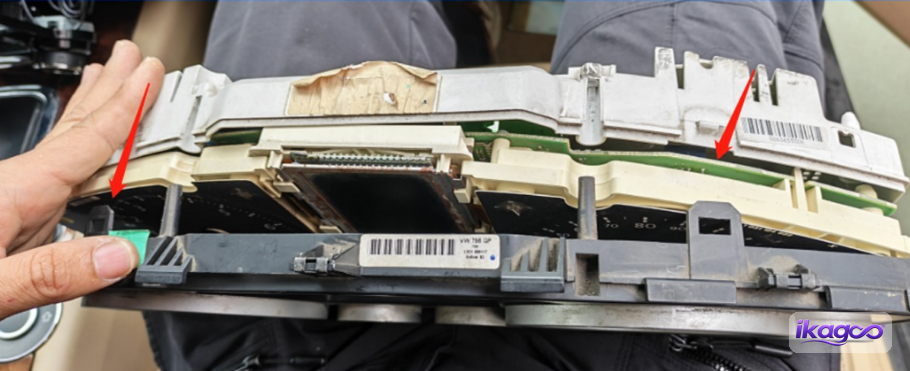
Ouvrez le boîtier d’origine du combiné d’instruments
Séparez soigneusement le boîtier d'instrument d'origine. L'objectif n'est pas simplement de démonter l'ancien combiné ; il s'agit d'atteindre l'électronique que la voie de rétrofit photographiée conserve et déplace.
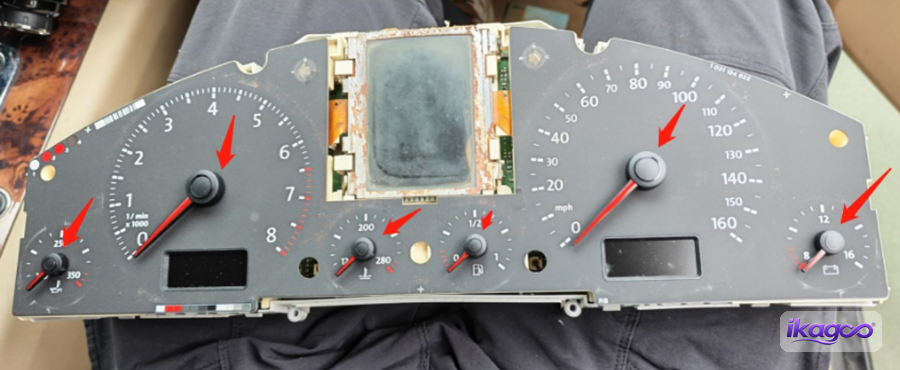
Retirez les aiguilles d'origine
Soulevez les aiguilles indiquées sur la photo source afin de pouvoir ouvrir davantage le combiné. Conservez les pièces d'origine retirées ensemble pendant que l'étape de transfert de la carte est terminée.
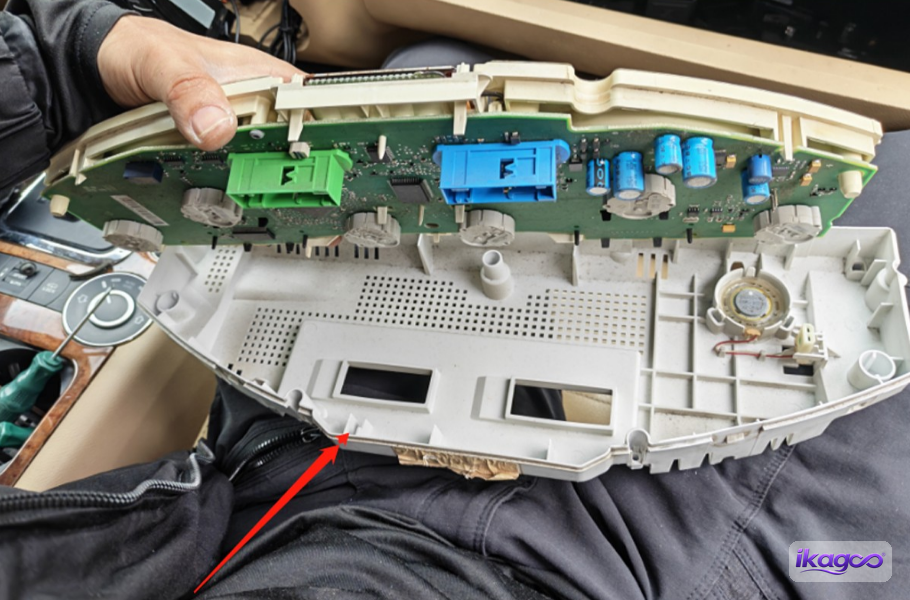
Détachez le boîtier inférieur
Ouvrez le boîtier inférieur indiqué sur la photo. Cela expose la connexion interne et la carte mère d'instrument d'origine utilisée dans les étapes suivantes.
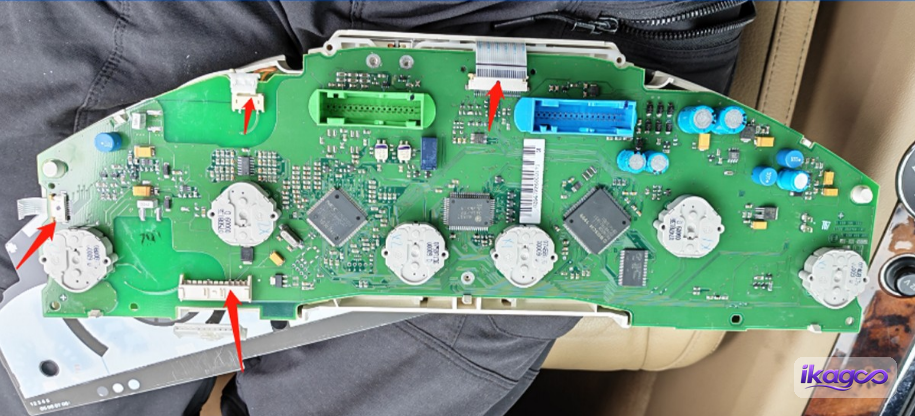
Débranchez le câble interne de l'instrument
Débranchez le câble interne situé à l'intérieur du combiné d'origine. Une fois cette connexion libérée, la carte principale peut être séparée du boîtier d'origine.
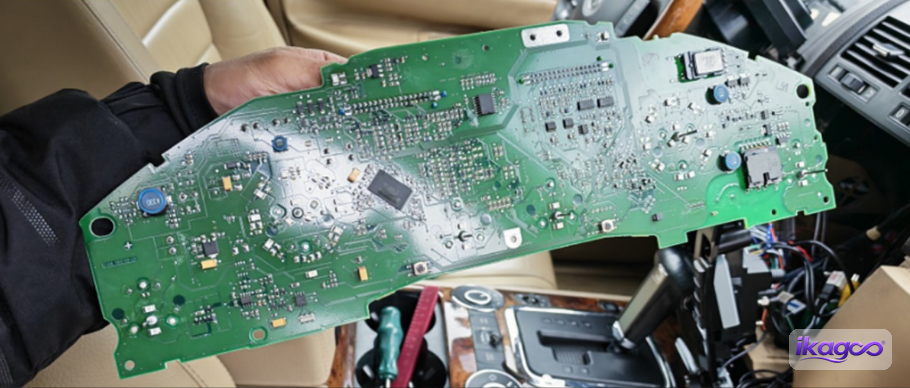
Conservez la carte principale de l'instrument d'origine
C'est l'étape technique déterminante de cette procédure d'installation : la carte principale du combiné d'origine du Touareg est conservée. La séquence source ne la jette pas ; la carte continue vers l'installation finale.
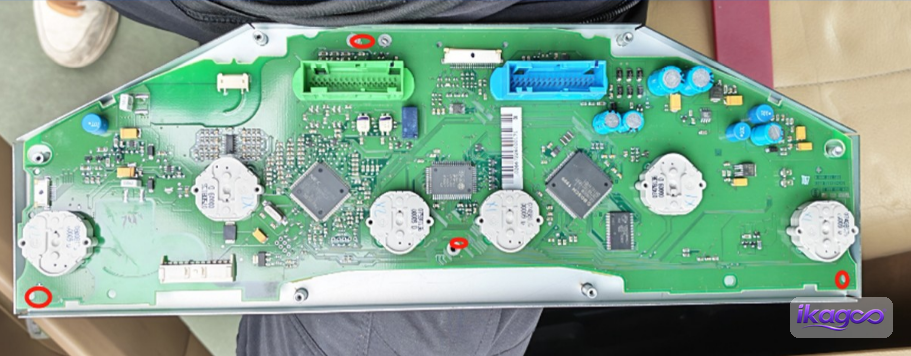
Montez la carte mère conservée sur le support métallique
Positionnez la carte mère d'origine sur le support métallique fourni exactement comme indiqué sur la photo. Le support offre à la carte une méthode de montage stable après sa sortie du boîtier d'instrument d'origine.
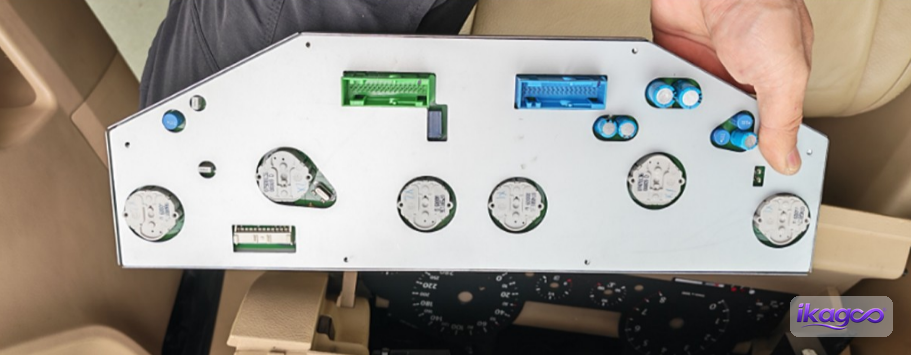
Vérifiez que la carte mère d'origine est bien fixée
Vérifiez le montage final de la carte avant de la déplacer du côté passager. La carte doit rester fixée au support avec son point de connexion disponible pour le câblage présenté plus tard.
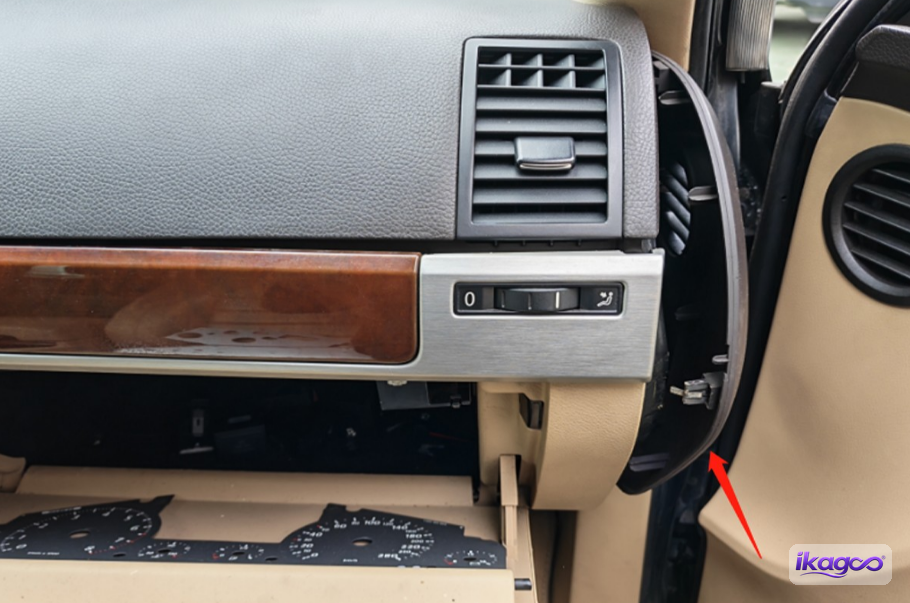
Où va la carte mère d'origine VW Touareg 7L 2003–2010 après la mise à niveau ?
Réponse directe : la carte mère d'instrument d'origine conservée est acheminée vers la zone de la boîte à gants côté passager. La garniture de la boîte à gants est ouverte, le câblage de la carte est reconnecté, et la carte reste fixée là dans le cadre du trajet final de la rétrofit.
Ouvrir le panneau côté passager
Déplacez-vous du côté passager et déclipsez le panneau latéral à côté de la boîte à gants. Cela ouvre la voie d'accès pour le câble de rallonge et la carte mère d'origine conservée.
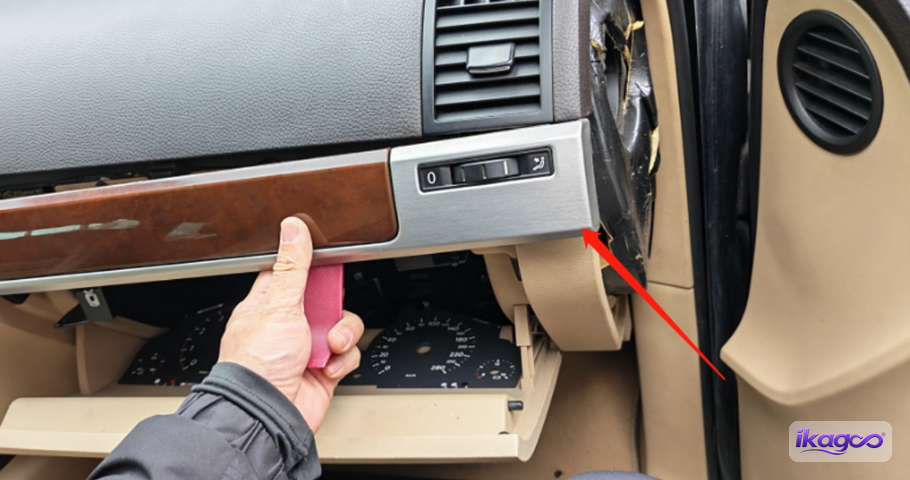
Déclipser la garniture côté boîte à gants
Retirez la pièce de garniture supplémentaire illustrée autour de la zone de la boîte à gants. Seuls les panneaux nécessaires pour atteindre le compartiment de rangement et l'emplacement de la carte sont ouverts.
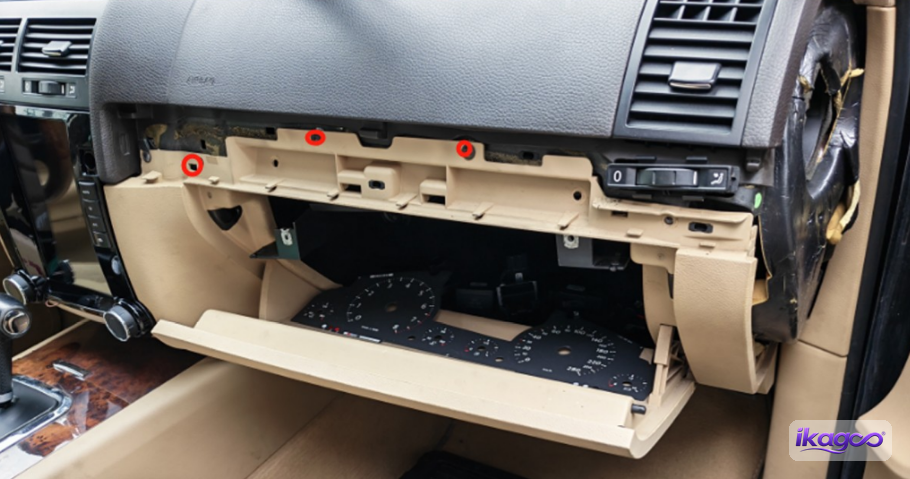
Retirer les vis de la boîte à gants
Retirez les vis qui maintiennent la boîte à gants/compartiment de rangement. Cela crée l'espace de travail nécessaire pour connecter et positionner la carte mère d'instrument d'origine conservée.
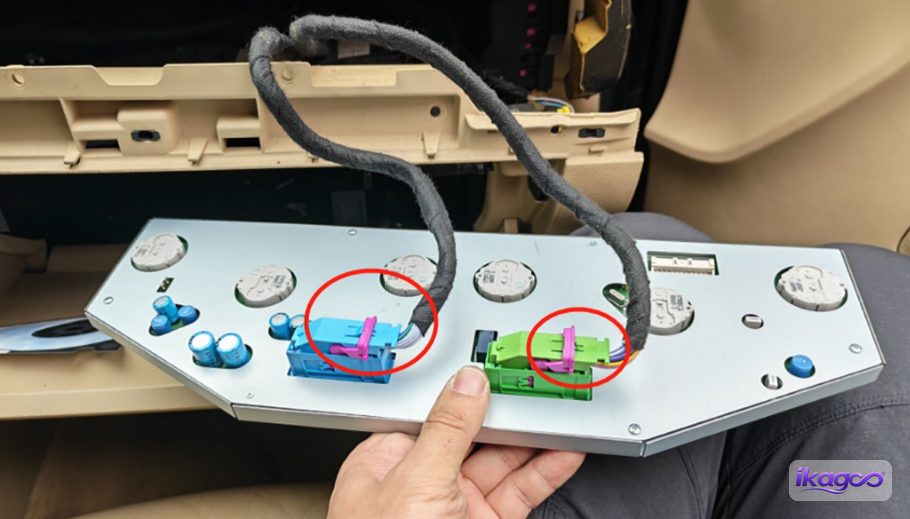
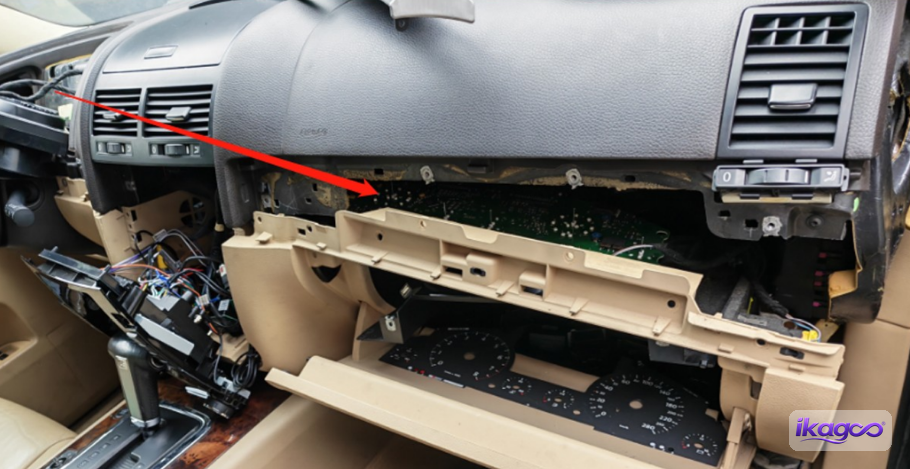
Rebranchez la carte mère d'origine conservée
Connectez le câblage à la carte mère d'origine conservée comme indiqué. Cette connexion complète le cheminement commencé lorsque le câble de rallonge a été tiré depuis le nouveau combiné à l'étape 20.
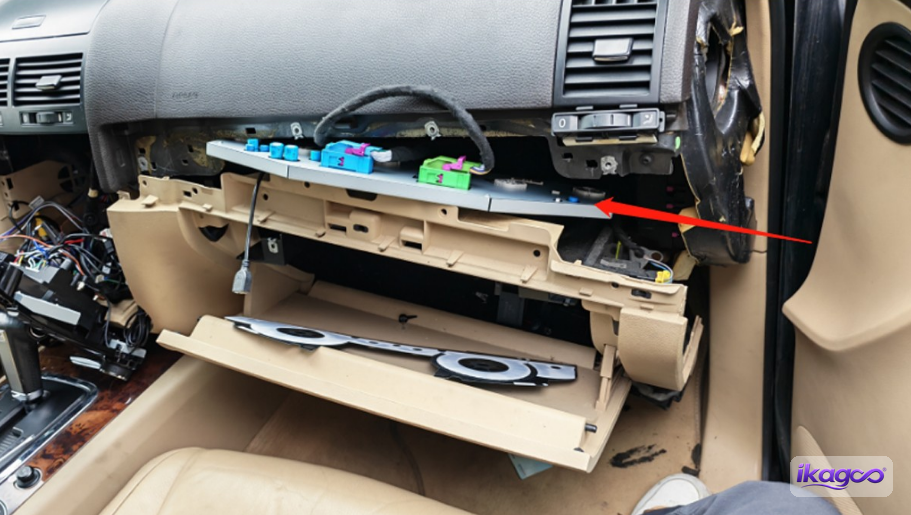
Placez la carte mère conservée dans la zone de la boîte à gants
Positionnez la carte mère d'origine conservée dans la zone de la boîte à gants côté passager en suivant la disposition photographiée. Avant de fermer la boîte à gants, vérifiez que la carte reste fixée à son support et que le câblage a assez de place pour rester connecté sans être pincé.
Mettez sous tension et vérifiez l'installation avant la fermeture finale
La source d'origine décrit l'étape finale comme le résultat de l'installation terminée, mais l'ensemble d'étapes extrait ne contient pas d'image distincte pour l'étape 37. Avant une utilisation normale, mettez le véhicule sous tension et vérifiez les fonctions qui s'appliquent à la version de combiné confirmée.
Que devez-vous tester après l'installation d'un combiné numérique sur une VW Touareg 7L 2003–2010 ?
Réponse directe : avant de fermer le tableau de bord, vérifiez le démarrage stable du combiné, la vitesse/le régime et les informations du véhicule pris en charge, les témoins d'avertissement, la communication du combiné, la connexion de la carte mère conservée et l'ajustement physique des garnitures. Le comportement CarPlay ou de synchronisation de carte spécifique au produit ne doit être vérifié que par rapport à la configuration confirmée.
Informations de conduite
Vérifiez l'affichage pris en charge de la vitesse et du régime, les valeurs de carburant et de température, la position de la boîte de vitesses et l'état des portes pour la configuration correspondante.
Informations d'avertissement
Confirmez que les témoins d'avertissement pris en charge s'affichent normalement et qu'aucun défaut de communication inexpliqué du combiné ne subsiste.
Ajustement physique
Vérifiez que le combiné et les garnitures sont correctement positionnés et que le câblage n'est pas comprimé lorsque les panneaux sont remis en place.
Fonctions d'affichage spécifiques au produit
L'affichage de la navigation ou de la carte CarPlay ne doit être évalué que par rapport à la fonction confirmée pour la version du produit acheté.
Pourquoi le support à long terme est-il important pour un combiné numérique sur une VW Touareg 7L 2003–2010 ?
Réponse directe : le support à long terme est important car cette adaptation de la Touareg combine un nouvel écran numérique avec un cheminement de faisceau spécifique et la carte mère d'instrument d'origine conservée. Si un problème survient ultérieurement, la commande d'origine, la version matérielle et le cheminement du câblage peuvent être nécessaires pour identifier le bon logiciel, la bonne pièce ou la bonne voie de réparation.
La page produit actuelle de la Touareg indique que iKAGOO maintient un support après-vente à long terme lié à la commande d'origine pour les conseils logiciels, le support des pièces et la coordination des réparations, ainsi qu'une garantie matérielle de 12 mois. Cette distinction est importante : la garantie a une période de couverture définie, tandis que la valeur de conserver un dossier produit/support traçable peut perdurer après l'installation.
C'est l'une des raisons pour lesquelles la décision d'achat ne doit pas être basée uniquement sur le prix le plus bas du premier jour. Un combiné numérique peut rester dans le véhicule pendant des années ; le fait que le vendeur puisse identifier ultérieurement le cheminement fourni peut réduire le risque d'acheter des pièces de rechange incompatibles ou de dépanner la mauvaise version.
Cette mise à niveau vers un combiné numérique pour VW Touareg 7L 2003–2010 convient-elle à ma voiture ?
Une mise à niveau vers un combiné numérique en vaut-elle la peine sur une VW Touareg 7L ?
Les preuves d'installation montrent comment la mise à niveau est effectuée, pas que chaque propriétaire en a besoin. Le cas de mise à niveau le plus solide est un propriétaire qui souhaite réellement le changement vers un cockpit numérique et prévoit de garder le véhicule. Un pourcentage spécifique à la Touareg n'est pas inventé ici tant que la métrique sous-jacente de la page produit est encore en cours de correction.
Ce combiné numérique iKAGOO s'adaptera-t-il à ma VW Touareg 7L ?
La compatibilité est vérifiée par rapport à la forme du combiné d'origine, à l'ouverture du tableau de bord, à la plateforme/configuration, à la position de conduite et à toute modification antérieure. La plage d'années est un périmètre produit, pas un substitut à cette vérification.
Puis-je installer moi-même ce combiné numérique sur ma VW Touareg 7L ?
L3 · Bricolage avancé. Le cheminement implique de retirer le combiné et plusieurs sections de garniture, de faire passer un câble d'extension et de conserver/transférer une carte électronique d'origine. Cela dépasse une simple installation d'accessoire.
Quand dois-je arrêter l'installation au lieu de continuer ?
Arrêtez lorsque le connecteur ne correspond pas, que l'ouverture du combiné diffère matériellement du cheminement documenté, que la carte d'origine requise ne peut pas être correctement conservée, ou que les informations de conduite critiques finales ne se comportent pas normalement.
FAQ sur l'installation d'un combiné numérique pour VW Touareg 7L 2003–2010
Le combiné numérique pour VW Touareg 7L est-il prêt à l'emploi ?
Pas au sens de “ débrancher une fiche et le travail est terminé ”. Ce cheminement iKAGOO utilise des connecteurs adaptés, mais l'installation réelle implique également de retirer les garnitures et supports du tableau de bord, de monter le nouveau combiné, de faire passer un câble d'extension et de conserver la carte mère d'instrument d'origine. Il est préférable de le considérer comme une adaptation spécifique au véhicule plutôt qu'un simple échange d'accessoire.
Ce combiné numérique s'adaptera-t-il à tous les VW Touareg 7L 2003–2010 ?
Aucune affirmation d'adaptation universelle ne doit être faite à partir de la seule année. La forme du combiné d'origine, l'ouverture du tableau de bord, la configuration à conduite à gauche ou à droite, le marché/la configuration et les modifications antérieures du tableau de bord ou du câblage doivent être vérifiés avant l'expédition. Si l'ouverture de l'étape 13 ne correspond pas au parcours documenté, arrêtez-vous avant de forcer le nouveau combiné en place.
L'installation d'un combiné numérique VW Touareg 7L nécessite-t-elle un codage ou VCDS ?
La source photo iKAGOO utilisée pour ce guide ne montre pas d'étape de codage, donc cet article n'affirme pas que le codage est toujours requis ou jamais requis. Les propriétaires de Touareg demandent fréquemment des informations sur le codage lors du remplacement des combinés d'origine, mais cette voie aftermarket est différente car elle conserve la carte mère d'instrument d'origine. Confirmez la configuration exacte fournie si le codage ou la configuration des paramètres est pertinent pour votre véhicule.
Dois-je programmer l'antidémarrage ou réadapter les clés ?
L'installation iKAGOO documentée ne montre pas de procédure d'adaptation de clé ou d'antidémarrage. N'appliquez pas automatiquement les instructions pour remplacer un combiné OEM Touareg complet d'occasion par ce retrofit, car le parcours photographié conserve la carte mère d'instrument d'origine. Si votre véhicule ou la version fournie nécessite une adaptation supplémentaire, cela doit être confirmé avant l'installation.
Mon kilométrage d'origine restera-t-il le même après le retrofit du combiné numérique ?
Les photos d'installation ne prouvent pas le comportement de gestion du kilométrage, donc ce guide ne promet pas un résultat universel. Comme les questions de kilométrage sont courantes lors du remplacement des combinés de Touareg, demandez à iKAGOO de confirmer la voie de kilométrage/affichage pour la version exacte fournie avant de commander si cela est critique pour vous.
Pourquoi ce combiné numérique Touareg conserve-t-il la carte mère d'instrument d'origine ?
Parce que c'est le parcours réel montré dans la source d'installation iKAGOO. Les étapes 24–31 ouvrent le combiné d'origine, conservent sa carte mère et la fixent à un support métallique. Elle n'est pas traitée comme du matériel mis au rebut.
Où est placée la carte mère d'instrument Touareg d'origine après l'installation ?
Dans ce parcours documenté, la carte mère d'origine conservée est reconnectée et positionnée dans la zone de la boîte à gants côté passager. Les étapes 32–36 montrent l'habillage passager et la boîte à gants ouverts, le câblage de la carte connecté et la carte restant dans cette zone.
La vitesse, le régime, le niveau de carburant et les témoins d'avertissement fonctionneront-ils encore ?
Ce sont des contrôles d'acceptation essentiels, pas des fonctionnalités à supposer aveuglément. Avant que le tableau de bord ne soit complètement fermé, vérifiez la vitesse/le régime pris en charge, le carburant/la température, les informations de rapport ou de porte le cas échéant, les témoins d'avertissement et la communication du combiné pour la configuration du véhicule correspondante. Si des informations critiques manquent ou qu'un nouveau témoin d'avertissement inexpliqué persiste, l'installation ne doit pas être considérée comme terminée.
Les cartes CarPlay apparaîtront-elles sur le combiné numérique Touareg ?
Le produit Touareg iKAGOO est vendu avec une voie de synchronisation des cartes CarPlay, mais le chemin d'affichage exact dépend de la configuration matérielle/contrôleur correspondante. Le fonctionnement de CarPlay sur un autre écran du véhicule ne prouve pas à lui seul que la navigation apparaîtra dans le combiné, donc cette fonction doit être confirmée par rapport à la version commandée.
Puis-je installer moi-même le combiné numérique VW Touareg 7L ?
Les installateurs DIY expérimentés peuvent peut-être le réaliser, mais ce n'est pas un travail de garniture pour débutant. Le parcours réel ouvre le combiné d'origine, manipule la carte mère d'origine, achemine le câblage à travers le tableau de bord et déplace cette carte vers la zone de la boîte à gants. iKAGOO classe ce type de travail comme DIY avancé de niveau 3 ; l'installation professionnelle est le choix le plus sûr si vous n'avez jamais travaillé sur des combinés d'instruments.
Que dois-je vérifier si le combiné est noir, redémarre ou affiche de nouveaux témoins d'avertissement ?
Gardez le tableau de bord accessible et documentez d'abord le symptôme. Vérifiez le connecteur principal du combiné, la fiche fine, le parcours du câble d'extension et la connexion de la carte mère conservée par rapport aux photos d'installation. Envoyez à iKAGOO le numéro de commande, les détails du véhicule, les photos des connecteurs et une courte vidéo du défaut avant de changer des pièces non liées ou de forcer une autre configuration.
Où puis-je acheter ce combiné numérique VW Touareg 7L 2003–2010 ?
Réponse directe : le même combiné numérique VW Touareg 7L 2003–2010 iKAGOO est disponible sur la page produit liée. Si la forme du combiné d'origine, la position de conduite, l'ouverture du tableau de bord ou la voie CarPlay/carte requise n'ont pas déjà été confirmées, soumettez les photos du véhicule pour un examen de compatibilité avant de commander.










Add comment
Vous devez vous connecter pour publier un commentaire.